|
Miller Graphics
GRAM Kracker
|
Millers Graphics GRAM Kracker is a device which plugs into the cartridge port which allows you to save and load cartridges
to the device or the floppy drive, but it is much more than just that. Another great feature is that once you have saved a program into the GRAM Kracker
you can actually make changes to the cartridge based program. You can even make changes to the computer's operating system!
(requires the 80k upgrade). The manual contains directions to change several cartridge programs including, Mini-Memory,
Extended Basic, and the Tax module to name a few.
If you have would like to learn more about all the capabilities this item, I would suggest reading the manual (available below).
The standard GRAM Kracker comes with 56K of memory, and you could have, for around $20 expand the memory to 80K. This is a
well built device, comes in a very heavy case, and all the boards are of the highest quality.
|
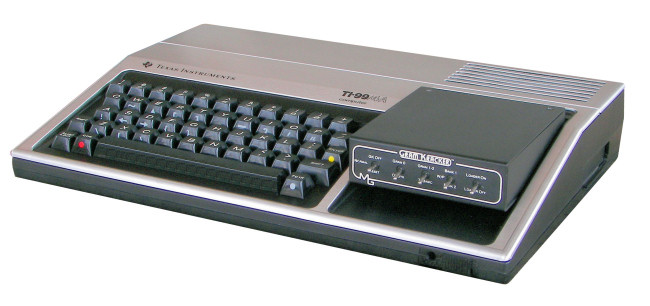
Here is a picture of the GRAM Kracker "plugged" into a TI-99/4A console
 |
|
Another shot of the GRAM Kracker plugged in with a cartridge also inserted. |
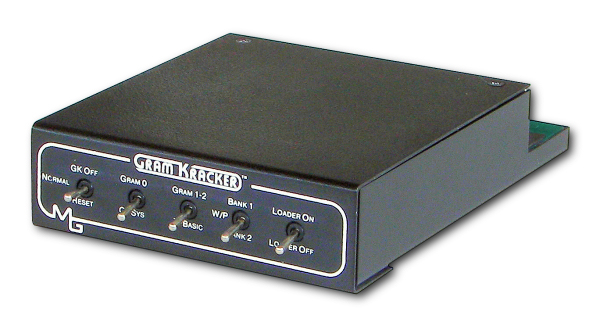
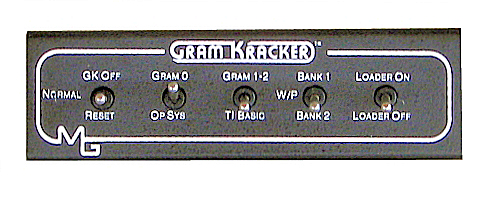
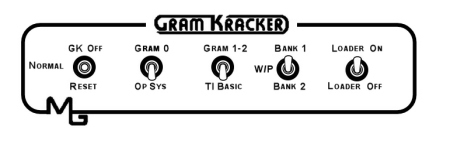
This shows the front of the GRAM Kracker and the 5 switches. The manual shows step by step how to use all
of the switches.
|
|
 |

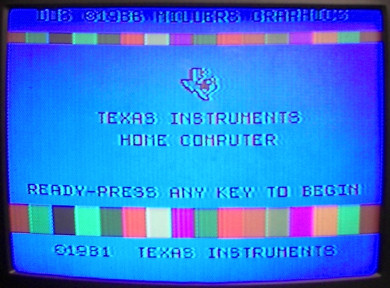
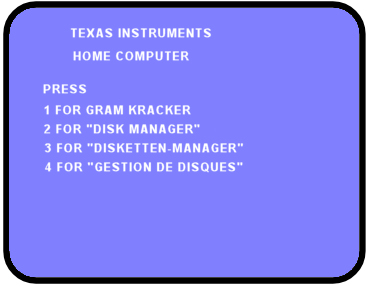
You know you have the GRAM Kracker plugged in correctly when you are greeted, by the screen shown above-left. Notice top
of the screen, it reads: DOS 1986 Miller Graphics. This only shows up if you have a PEB with the common goodies hooked up.
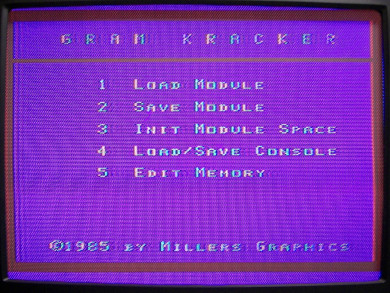
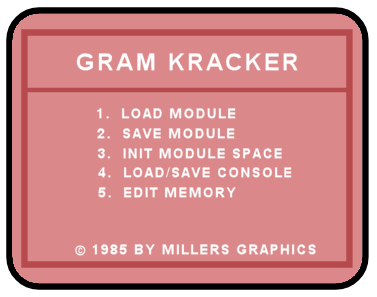
The other screen shot above shows the main menu after choosing GRAM Kracker. You will only get options 4 and 5 with the PEB.
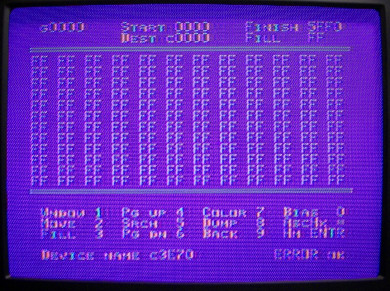
The screen below shows the edit memory screen. This actual shot is of a test that is in the manual to make sure that all
the memory is performing correctly. This is one time when getting all "F's" is a good thing!
|
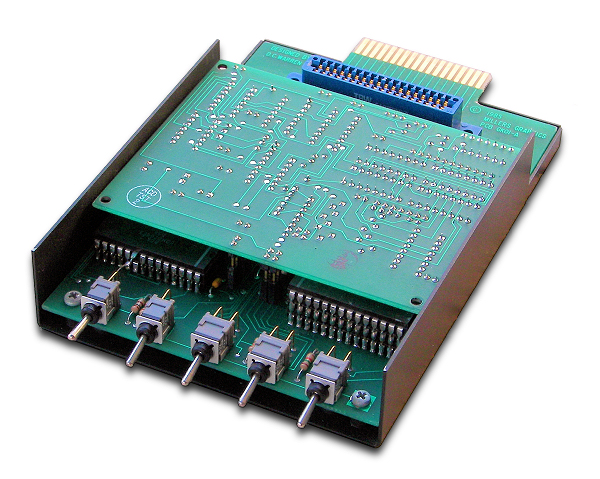
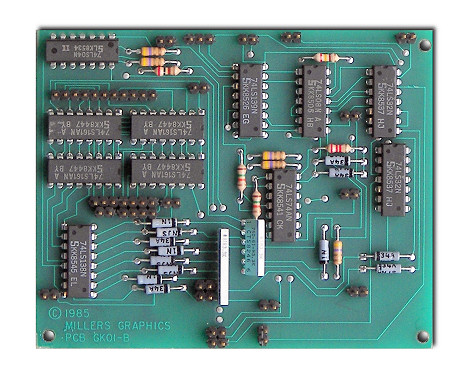
This shows the GRAM Kracker with the top cover removed. There are two circuit boards, which are connected together
by connector pins. You do need to separate these boards to add the 80K expansion or replace the battery.
You can also see the connector which plugs into the cartridge port, and the blue cartridge connector.
|
|
 |
 |
|
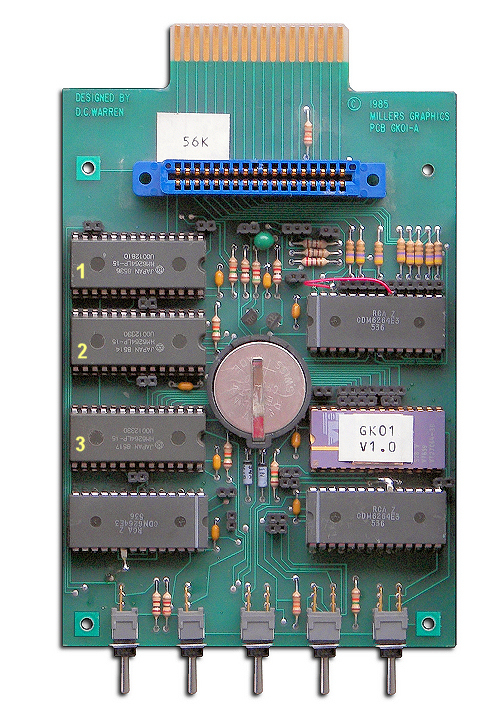
Here is a shot of the memory board. Notice the battery, this allows any cart that you have loaded into the GRAM Kracker
to be saved, even when power has been turned off at the console. The blue connector is where you plug in a cartridge, to
"save" it or just run the cartridge.
One of the switches turns off the GRAM Kracker so you don't really have to ever
remove it from the console. As can be seen this board is well constructed.
The three chips marked, 1, 2, and 3 are the additional RAM chips installed to make this an 80K GK. If there are only
3 empty sockets then it is a 56K GK. The 3 chips are easy to get and are HM6264LP-12 8K SRAM chips.
The battery is also easy to find and it is a CR2430, 3 volt lithium cell, positive up.
|
Here is a picture of the logic board. You can see all of the pins that need to be lined up correctly with
the memory board when you are connecting them back together.
|
|
 |
Quick Start
LOADING A CARTRIDGE
(All directions below assume you have a PEB with expanded memory and a disk drive, and for my demo I used a
Disk Manager 2 cartridge)
1. Make sure computer is turned off and slide the GRAM Kracker in to the cartridge port.
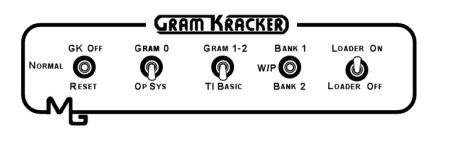
2. Before turning on the computer make sure switches are set as shown above.
3. Plug the cartridge you wish to save into the GK and Reset the computer by pushing the GK OFF/RESET switch down. The
switch is spring loaded and it should return to the NORMAL setting. (CAUTION: It is important that you plug the cartridge
in correctly and NOT backwards, see picture above.)
4. From the TI menu choose GRAM KRACKER, you should now see the screen below:
Keep in mind that if you DO NOT have memory expansion you will not see options 4 or 5 on the screen.
5. Place a initalized disk into the disk drive.
6. Select "2 SAVE MODULE" from the menu, and follow the directions on the screen. After entering the Device.Filename,
such as DSK1.DISKMANII and hitting the space bar you should see the message SAVING on the screen. When the GK has finished
saving the file to the disk, it will return to the above menu.
It is best not use a number at the end of the filename as, if needed, the GK will increment a number on the end of each
file it has to create.
That's it! You have now saved the contents of a cartridge to a floppy disk.
LOADING A SAVED CARTRIDGE
1. The switches are set as shown below:
2. Make sure you DO NOT have a cartridge plugged into the GK.
3. RESET the computer and select GRAM KRACKER from the TI menu.
4. Now choose, "3 INIT MODULE SPACE" from the menu. You will now see the screen as shown below:
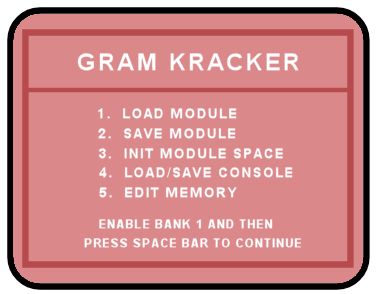
5. Place the BANK 1/BANK 2 switch in the BANK 1 position as shown below, and hit the space bar.
6. Next it will ask you to ENABLE BANK 2, as shown below: Hit the space bar to finish.
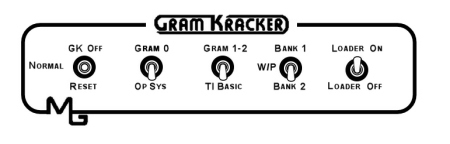
7. Now place the BANK 1/BANK 2 switch back to the WP, center position.
8. Choose "1 LOAD MODULE" from the menu, and type in the device.filename with the name that you saved it with
such as DSK1.DISKMANII
9. You will now see LOADING appear on the screen, and then it will ask you enable BANK 1. Depending on the type of
cartridge you are loading it may ask that you enable BANK 2 first (Extended Basic as an example). Just follow the instructions on the screen.
10. When the GK is finished LOADING the cartridge, it will return to it's menu screen.
11. Reset the computer, and if everything went well, you should see the below screen on the TI menu screen.
12. If your battery is in good shape you can now turn off the computer, and the next time you turn on the computer you
will still have DISK MANAGER 2 loaded in the GK.
Keep in mind that the GK can do much more then just what was showed above. The manual below shows all the very neat
things this device can do.
|
You can download the GRAM Kracker manual here.
(pdf 29 meg)